When it comes to breaking through tough ground surfaces, frozen soil, or compact rock, the Excavator Single Shank Ripper stands out as one of the most powerful and efficient attachments. Designed for maximum penetration and durability, this attachment can dramatically increase your machine’s productivity—but only if it’s set up and used correctly. Proper installation, alignment, and maintenance are key to getting the best performance from your excavator ripper.
In this blog, we’ll explore how to correctly set up your excavator ripper attachment, fine-tune it for different applications, and maintain it for consistent, long-term performance.
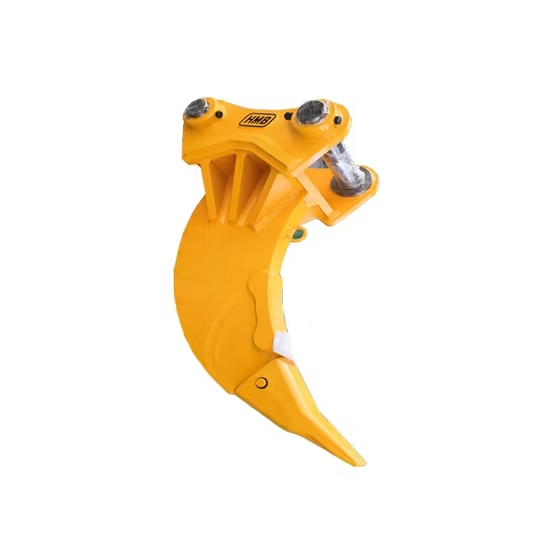
The Excavator Single Shank Ripper is a heavy-duty attachment featuring a single pointed tooth designed to penetrate and break up hard materials. It is commonly used in:
Site preparation for construction
Quarrying and mining operations
Removing frozen ground and compact clay
Breaking asphalt, concrete, or rock layers
The single-shank design allows for maximum digging force to be concentrated at one point, providing deeper and more precise penetration than multi-shank rippers. When properly set up, this attachment can greatly reduce wear on your excavator’s boom and bucket while increasing efficiency.
Before installation, ensure that the Excavator Single Shank Ripper is compatible with your excavator model and operating weight. The wrong ripper size or design can cause imbalance, excessive fuel consumption, and even damage to the hydraulic system.
Key considerations include:
Machine weight and power: Match the ripper size to the excavator’s operating capacity.
Tooth material and design: Choose high-strength, wear-resistant steel teeth suitable for your soil or rock type.
Shank shape: Curved shanks work better for clay and frozen soil, while straight shanks perform well on rocky terrain.
Proper setup of the Excavator Single Shank Ripper is essential for efficient performance and safety.
Follow these setup steps:
Check the quick coupler or pin system: Make sure it fits tightly and that locking pins are fully engaged.
Inspect the hydraulic lines (if applicable): For rippers with hydraulic capabilities, ensure hoses are correctly connected, with no leaks or pressure loss.
Verify tooth orientation: The ripper tip should align directly with the excavator’s boom for maximum force transmission. Misalignment can cause uneven wear and lower efficiency.
Test the range of motion: Slowly operate the boom and stick to ensure smooth movement without interference.
A well-aligned ripper attachment not only improves penetration but also reduces stress on your excavator’s components.
Once your ripper is installed, proper operating techniques are vital to achieving optimal results.
Here are some best practices:
Start with short, controlled strokes: Avoid aggressive force at the beginning. Gradual penetration allows better material breaking without overloading the hydraulic system.
Work in layers: Instead of trying to break through the entire depth in one pass, rip in multiple shallow passes.
Use correct angles: Keep the ripper tooth at around 30–45 degrees to the surface for maximum leverage.
Avoid side loading: Always pull in a straight line to prevent shank bending or tooth damage.
Adjust speed: Operate at moderate engine RPM for better torque and fuel efficiency.
By following these methods, your Excavator Single Shank Ripper can deliver superior ripping performance with minimal wear and tear.
Regular maintenance ensures your ripper attachment continues to perform at peak efficiency.
Key maintenance steps:
Inspect the tooth and shank daily: Replace worn or cracked parts immediately.
Lubricate pins and joints: Proper greasing prevents premature wear and corrosion.
Check for cracks: Weld or repair small cracks early before they worsen.
Clean after use: Remove mud, debris, and rock buildup to prevent rust and improve visibility for inspections.
By maintaining your Excavator Single Shank Ripper properly, you extend its lifespan and reduce costly downtime.
Always prioritize safety when operating heavy machinery with attachments like a ripper. Operators should wear proper protective gear and follow manufacturer instructions. Maintain a clear working area and ensure all workers stay at a safe distance during operation. Avoid using the ripper as a prying or lifting tool—it’s built for penetration, not leverage.
The Excavator Single Shank Ripper is an indispensable tool for breaking through challenging ground conditions efficiently and safely. By selecting the right model, ensuring proper setup, and following disciplined operation and maintenance practices, you can achieve maximum productivity and equipment longevity.
Whether you’re in construction, mining, or land development, taking the time to set up your ripper attachment correctly will pay off in faster work cycles, reduced wear, and overall better performance from your excavator.